

Now, like never before, people have an abundance of photos, and most people don't even print them up. All their memories and histories are lying dormant, just waiting to be lost and forgotten. Forever.


This article was updated in 2022.
At the same time, when you're staring hundreds (or thousands) of photos in the face, it's not exactly the easiest undertaking!
So let me share some advice with you that I've shared with others. Breaking down the process into manageable pieces is vital. And you'll be SO HAPPY with the result. It's very definitely time worth spending. Here are some tips to help you tackle your mountain (or hard drive) of photos.
1. DISCOVER WHAT WORKS FOR YOUR BRAIN
I will outline my recommendations and add in a few things that I've seen others do. The most important thing is that you find what works for YOU, what makes the most sense to YOU. It can be hard to follow someone else's system if it doesn't click for you in your brain.

2. ORGANIZE
Find out what you have. Enlist some help if that makes it easier. I recommend sorting photos by year. One of my clients prefers to sort hers by event (such as Christmases through the years, trip to Bahamas, etc.).
If you have printed photos, put them in manila envelopes or boxes. LABEL the envelopes/boxes with the year. (These will obviously need to be scanned in order for you to publish them digitally.)
If you have digital photos, I suggest putting them in folders on your computer. Be as specific as you can, because it will help as you go through and find what you need. The way I do it is I have a folder for each year. Then, for example, inside the folder labeled 2010, I have more folders "Jan. 2010," "Feb. 2010," etc.
I have a client who was overwhelmed at organizing her photos because she said she hadn't tagged any of the photos, meaning she hadn't changed the names of the digital photo files to say who is in the photos and when they were taken.
You *can* do that if you want to, but it would be SO MUCH WORK, and I really think it's unnecessary.
First of all, when you take a picture, that picture (jpg file) is assigned a number. If you leave them as numbers, they will always be in chronological order because they'll be in numeric order on your computer. If you rename them, then they will be re-ordered in your folders in alphabetical order. They may be harder to find if you don't remember what you called them.
Second, the whole purpose in DOING SOMETHING with your photos is to get them out of just digital form and bring them to life!! When you place your photos in a digital photo-storybook, you can tell their stories THERE. Just organize your photos in a way that you can know where to find them when you start putting them into a book or scrapbook page. All of the details will be in the book.

3. CHOOSE THE BEST PHOTOS
I have a client who has about 30 photos of her parents. In that case, every single one of those is the BEST photo. She wants to save and use them all, whether they are a little blurry or faded or whatever. They are ALL the best and worth saving and publishing.
If you have 30 photos of your child at the park last Tuesday, I recommend choosing your favorite 2 or 3 or 4. Don't be afraid to not use some of the photos you've taken. In this digital age, we are often in the habit of taking as many photos as we want so that we can be sure to get a good shot. But then we feel like we need to use them all, which is not the case. Stick with the best ones, your favorites. It will help you not feel as overwhelmed, and it will streamline your final product.
4. START SMALL (& START EASY!)
It can be overwhelming when you know you have 20 books you need to make to get caught up on the photos you've taken over the last however-many-years. But all you have to do is start with ONE.
Here, again, you'll need to decide what works for you. I would recommend starting with whatever is the easiest to remember, or the most fun to put together. Maybe you remember last year the easiest. Maybe the Disneyland trip from a few years ago will be the most fun to create. Or maybe you want to start with the oldest pictures you have and move forward in order. Do whichever makes the most sense to you and will be easiest. And only focus on that ONE book. Don't think about how you have to do 20. Just do ONE!
5. CHOOSE YOUR METHOD
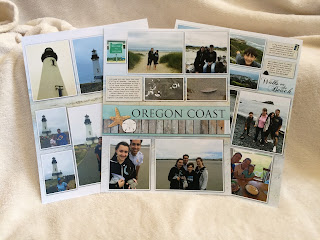
You could publish your photos and memories by event. Here's one example.

I have to say that if I were trying to get on top of my photos and get them published and I were a few years behind and feeling anxious about getting caught up, I would DEFINITELY do it family-yearbook style. Because it's chronological, it's so NEATLY ORGANIZED that it would be easy for me to just go back through my photos and plug them right into this book!!

I already know where the Halloween 2012 photos go--in the 2012 book in the October pages. Easy!
This is the easiest way I know of to make a family yearbook:
Pre-designed templates like these are particularly helpful if you have a lot to catch up on or just plain don't have a lot of time.
If you prefer full flexibility and creativity with the same heirloom-quality books and photo privacy promise from the video above, you'll LOVE digital scrapbooking! Here's an introduction to Artisan digital scrapbooking software which has so many amazing possibilities. This video is an overview--for more details on what you can do in Artisan, click here.
Whichever method you choose, do what makes the most sense to you.
6. TELL THE STORY
A book full of pictures with no text is absolutely no better than a shoebox full of pictures with no information written on the backs.
Don't forget the STORIES behind the photos. You take every photo for a reason! Write it down. Tell who is in the photo, where it was taken, when, and why. Write memories of incidental things that happened along the way. Pretend you're on the phone with a friend telling her about the event. Then write that down.
There's no better way to make family connections than to remember the connections you've made in the past so that you can build on them. Get started right here.

This article was updated in 2022.