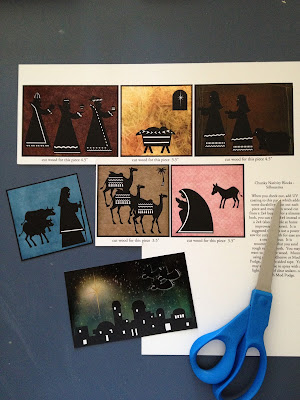
These are just as simple and inexpensive as the other block tutorials I've shown. This project cost me about $7.
UPDATE 2022: The Heritage Makers website and software is currently being reworked so it will no longer run on Adobe Flash (which Adobe has discontinued). At the moment, it's easier for me to just order these scrap pages for you on your behalf and have them shipped to you than it would be for you to open your own Heritage Makers account and find the template. Contact me with questions or to order.
Here's what you need:
- Heritage Makers template 112226. This is actually my own template--I created it! Then I just submitted it to Heritage Makers and let them add it to the template gallery. You can see it at www.heritagemakers.com/jenniferwise. Just click the "template gallery" link at the upper right, then type 112226 into the search field.
- about 2 1/2 feet of a 1x4 piece of wood (This size is also found at home improvement stores. I had no idea this even existed. But I REALLY LOVE the slimmer look for this particular nativity set. I just think it's more sophisticated than the 2x4. Again, even though the wood is called 1x4, it actually measures smaller--about .75"x3.5".) You'll need to cut the wood into one 5.5" piece, two 4.5" pieces, and four 3.5" pieces.
- a saw (power saw recommended), or a nice person at said home improvement store who will cut the board into pieces for you--just be sure you take the measurements with you.
- black paint (Craft paint or spray paint; I use craft paint. I chose black because the silhouettes are black. I think it looks really sharp. But you can choose whatever color paint you prefer.)
- adhesive (spray adhesive, Xyron, double-sided tape, Mod Podge, or UHU stick)
STEP 1: create the beautiful part
You can always create your own designs from scratch, but feel free to use my design (template 112226). Place the template into your account by doing a search for it in the Template Gallery. Once you find it, click on it. Then click "personalize." This template was made from the Premier Art collection, so you'll need Premier Art access. The easiest way to get that is through Club HM because it's free AND you get the best price on everything you publish with Heritage Makers. Click here for Club HM information. Once it's copied over to you account, you can also change things in my design if you want--background colors, borders, whatever. This was made on a 12x12 scrapbook page, which is 6 publishing points (or $6 retail). I'm in Club HM, which means I get discounted publishing points deposited into my account each month to use however I want, so I'm actually saving 33%. This print cost me $4. If you've been to the post office, you know shipping isn't cheap--so what I did was save this print until I was ordering other things, and I ordered them at the same time to save on shipping. I always do that.
Preview your project with the "preview" button to see how it will print, then submit it for publishing. While you wait the 7-10 days for it to come in the mail...
STEP 2: cut your wooden blocks
I've put directions right on the Heritage Makers scrapbook page, so when it's printed, just follow the directions. I'd recommend that you cut the blocks with a power saw, to save time and to get a cleaner cut. (You'll notice that the wood is cut slightly larger than the Heritage Makers pieces--it's easiest to have a little bit of a wood border around your HM pages. It protects it a bit, and it's easier to place the pieces on the blocks without worrying about how the edges meet.) I really love this slimmer 1x4 wood!
STEP 3: prepare the wooden blocks
Sand rough edges. Paint (I'd recommend painting all sides, but I suppose you could leave the back and the bottom unpainted if you'd prefer.)
Let dry completely.
Sand rough edges. Paint (I'd recommend painting all sides, but I suppose you could leave the back and the bottom unpainted if you'd prefer.)
Let dry completely.
STEP 4: cut out the cuteness
Once you get your finished scrap pages in the mail from Heritage Makers, just cut out the pieces.
STEP 5: adhere the cuteness to the blocks
Use spray adhesive, Xyron, double-sided tape, Mod Podge, or UHU stick on the back of each of the pieces of scrap page. I used double-sided tape for my decorative tiles, and Mod Podge for my Chunky Nativity Blocks for Kids. This time I am trying the Xyron...which I have never used before!
It's so easy and fast!! You just put your pieces in the machine and turn the handle.
Keep turning the handle, and when they come out the other side,
they are essentially a sticker! Just peel it off and adhere it to the corresponding size blocks.
I loved the Xyron for its ease and speed. The only thing I didn't like was that the edges of the piece are sticky, so I had to rub off the excess. I liked it so much, though, I'd definitely use it again. Feel free to use whatever method you prefer to adhere the pieces to the blocks. You can spray with a sealant if you want, but I didn't.
Next Step: Wait for the compliments!
That's it! You've just made a simple, classy, crafty ($7) nativity!! Show off in your home or give as gifts.
![]() |
Save and share by Pinning this image to Pinterest! |