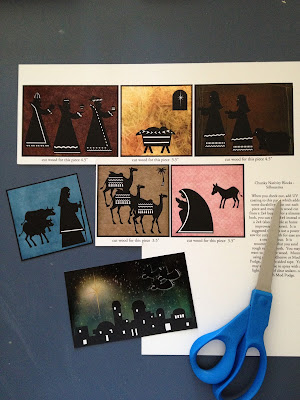
These are just as simple and inexpensive as the other block tutorials I've shown. This project cost me about $7.
Here's what you need:
- Heritage Makers template 112226. This is actually my own template--I created it! Then I just submitted it to Heritage Makers and let them add it to the template gallery. Just click the "template gallery" link at the upper right, then type 112226 into the search field.
- about 2 1/2 feet of a 1x4 piece of wood (This size is also found at home improvement stores. I had no idea this even existed. But I REALLY LOVE the slimmer look for this particular nativity set. I just think it's more sophisticated than the 2x4. Again, even though the wood is called 1x4, it actually measures smaller--about .75"x3.5".) You'll need to cut the wood into one 5.5" piece, two 4.5" pieces, and four 3.5" pieces.
- a saw (power saw recommended), or a nice person at said home improvement store who will cut the board into pieces for you--just be sure you take the measurements with you.
- black paint (Craft paint or spray paint; I use craft paint. I chose black because the silhouettes are black. I think it looks really sharp. But you can choose whatever color paint you prefer.)
- adhesive (spray adhesive, Xyron, double-sided tape, Mod Podge, or UHU stick)
Create your design (or ask me for mine), and order the scrapbook pages.
2023 UPDATE: Heritage Makers became YPhoto under Youngevity (which purchased Heritage Makers in 2013). YPhoto uses only templates, so the creativity showcased here is no longer available there. Best-in-the-industry quality and permanent cloud photo storage with guaranteed privacy are required for anything recommended here by Photo & Story Treasures, so we highly recommend Forever.
Using Forever's Artisan program for digital scrapbooking, you can make items similar to those shown here. This video tutorial shows you how to craft with high-quality scrapbook pages, and this one shows you how to use Artisan to create something unique and then print at home (for instances in which you need thinner paper, sticker paper, etc.) You can see just a few examples of crafting I've done using Artisan here, including cards, magnets, dry-erase boards, and other products.
Sand rough edges. Paint (I'd recommend painting all sides, but I suppose you could leave the back and the bottom unpainted if you'd prefer.)
STEP 5: adhere the cuteness to the blocks
It's so easy and fast!! You just put your pieces in the machine and turn the handle.
I loved the Xyron for its ease and speed. The only thing I didn't like was that the edges of the piece are sticky, so I had to rub off the excess. I liked it so much, though, I'd definitely use it again. Feel free to use whatever method you prefer to adhere the pieces to the blocks. You can spray with a sealant if you want, but I didn't.
Next Step: Wait for the compliments!
That's it! You've just made a simple, classy, crafty ($7) nativity!! Show off in your home or give as gifts.
 |
| Save and share by Pinning this image to Pinterest! |


No comments:
Post a Comment
Let us know you visited: Leave a comment! We aim to be positive, informative, and inspiring here, so any comments that match this vision are welcome. Comment moderation is in place, so you may not see your comment right away. Please note that comments with advertisements are not published.