Monday, November 28, 2016

home decor: crafting with coasters

I'm sure that title makes you think:

"Um.  What?!"

But, yes, I'm going to show you a craft project using coasters I made!

I first saw this coaster wall hanging idea online and thought it looked kinda cool.  And then some things got changed around on my bathroom wall, and all of a sudden this was going to be the PERFECT thing to go there!

The first thing I did, of course, was create the coasters using my own beach photos.  {You can do the same thing by creating your own coasters.}  And I'm here if you have questions.  

I received the coasters in the mail after a week or two, and then I gathered all my crafting supplies together:


I did a beach theme, and I created the coasters using all pictures of beaches we've personally been to as a family in recent years.  It was so fun!  You can't see it all that well here, but in the bottom corner I actually put the place and date in small font.

Here's the low-down on coasters.  A little shy of 4" square, cork-backed, and a really glossy, nice finish on the front.  (I honestly LOVED how my photos looked on these!!)


You might notice in my "supplies" photo (that I showed you first) that one of my supplies was a set of earrings!  The original instructions for this craft were to use a "large book ring."  I have one, but I just didn't like the look of it.  So I thought What else is cheap but would look good and do the same thing?  Walmart earrings, of course!  :D


I closed the clasp and then folded the ribbon over and hot-glued it.  (And, yes, this is really "ribbon," but it looks pretty different.  I was hoping for a beachy, flip-flops-and-hat kind of look.

I expected this to be a little harder or more complicated, even though I knew how simple this project was, but for the next step you literally just hot glue the coasters to your length of ribbon.  And that's it!

Photo credit to my daughter for that last one!

I saw that phrase "The beach fixes everything" on a sign once and adored it.  That is definitely a true statement for me!


And there it is on my wall!  I decided to dress it up a bit with the ribbon because I cut the bottom ribbon a bit too short, but those bows and knots are completely optional.

This is SUCH a fun project and SO EASY and such a cool way to display your photos.  If you do this craft, I'd love to see YOUR photos!  E-mail them to me at the address in the "contact me" tab above!  Or just join my Facebook group and share it there--it's so fun to see each other's photo creations.

2022 UPDATE:  You have 3 options for creating your photo coasters, so choose which one sounds best to you!  First, you'll need a free Forever account, so open yours here, and then you can upload your photos to your private account.  (You can watch this video about uploading photos, if you like--it also includes some photo organizational tips.)  Explore these 3 ways for making your coasters, and pick your favorite--they're all printed at the same high-quality print shop at Forever.
  1. AutoPrint:  At that link, scroll down a little until you find coasters.  Be aware that they can be up to 50% off, so wait for a good sale before ordering if you like.   This is the simplest of these 3 options--all you do is choose your favorite 4-12 photos, and AutoPrint will put them right in your coaster project.  Just remember, the fewer photos per coaster, the larger they will print.
  2. Design & Print:  At that link, choose your favorite design, from monograms to coasters that allow text.  You'll add photos yourself, wherever you want them on your coasters.  Some text is editable, some is part of the design.
  3. Artisan:  Unlike the free, simple designing you do with AutoPrint and Design & Print, Artisan is your key to full creativity and flexibility.  Artisan is a computer program for digital scrapbooking that you purchase and download.  If you're looking for a fun and creative way to preserve your memories, I highly recommend Artisan!  (I'm in love.)  You can personalize your coasters with photos and text anywhere, choosing your own fonts from your computer, etc.  (Note: If you just want to make some coasters and aren't particularly looking at a digital scrapbooking software purchase, contact me.  I do hire out to make projects for people, and this one wouldn't take me long at all.)  
Enjoy this fun craft project using your own photos!  It's a great way to display some special photos and memories.

Monday, November 21, 2016

craft fair display

I wanted to up my game a little where my craft fair display was concerned.  I've been doing craft fairs for about 8 years, in 3 different states, so I've seen a lot and have been considering how to draw more attention to my booth.  I decided I needed to go HIGHER.

I need to have a display that stores well, without taking up much space, from year to year.  I love the idea of crates and tents and some of the other things you see at craft fairs, but in addition to the storage issue, spending a lot isn't really an option for me right now.

After some internet searches, I decided to use white pegboard (just from my local home improvement store).  I have two different tables showing two different types of things, and I wanted to give each pegboard stand a "title" so that people can see it before they come to my booth.  And I wanted it to be cute.  :)

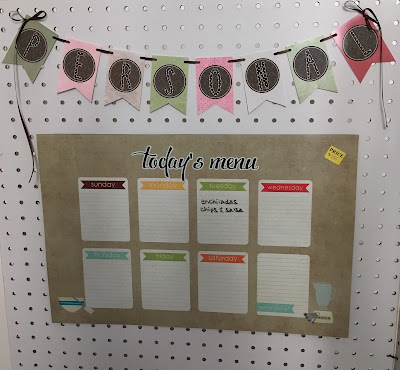
I created cute little banners from a Heritage Makers 11x14 print.  The advantages here are
  • I could create it exactly like I wanted, with LOTS of choices of (included) digital art 
  • prints are a little over $3 each
  • I got the optional UV coating, which gives them a little more durability
I actually also really like this because I made these banners to match my business cards, flyers, and tri-fold brochures.

I submitted the prints for publishing and got them back about a 8 days later.  They looked like this

At my booth, I display items made via "online, digital personal publishing," and I also display "papercrafting & scrapbooking" items, so I have two different styles of banner pieces, as you can see.

Then I cut them out,


punched holes in the corners, and threaded some ribbon through.


Since these banners are only about 3" tall (you could make them bigger if you want), I used a mini hole punch and 1/8" ribbon (which costs almost nothing).  I did secure the ribbon on the back of each piece with a little tape just to keep them from sliding on the ribbon.

2023 UPDATE:  Heritage Makers became YPhoto under Youngevity (which purchased Heritage Makers in 2013).  YPhoto uses only templates, so the creativity showcased here is no longer available there. Best-in-the-industry quality and permanent cloud photo storage with guaranteed privacy are required for anything recommended here by Photo & Story Treasures, so we highly recommend Forever.  

Using Forever's Artisan program for digital scrapbooking, you can make items similar to those shown here.  This video tutorial shows you how to craft with high-quality scrapbook pages, and this one shows you how to use Artisan to create something unique and then print at home (for instances in which you need thinner paper, sticker paper, etc.)  You can see just a few examples of crafting I've done using Artisan here, including cards, magnets, dry-erase boards, and other products.


I used a total of six pieces of common white pegboard because I was making three background displays total.  They were 4 ft. high and 2 ft. wide.  Each piece was $8.  I put each pair together with white duct tape on the back, then pushed ribbon through the duct tape (using an x-acto knife) and tied them together for a little extra security.

Then it was time to put my adorable banners on the pegboard (just with tape).


I bought some pegs and some baskets made for pegboards as well.  Again, just at the home improvement store.
 

In my "personal publishing" section of goods, I sell a couple of magnetic items, so I bought some sticky-backed magnet strips (available at craft stores--I got mine at Walmart).


SEE??  It works!  :)


(I love doing creative things with the Heritage Makers car magnet.  It's 12x18, so although it goes great on a car for business, it also goes great on a fridge for a family calendar or menu planner, or on a file cabinet for a vision board!  You can write on and wipe off with a dry-erase marker!)

Ready to see what the display boards look like AT the craft fair??


I clearly need some more baskets for that last set-up!  This was my first run using the new pegboards, so next time I'll have it covered.  :)

I really love the height, but I especially love the little personal (and cute) touch the banners give to the pegboards.  I wish they were a little bigger, but what I wanted to say is really long!  Still, it really gave a nice feel to my display and is a big improvement over past years. 
HAPPY HOLIDAYS!

Friday, November 18, 2016

you don't keep something as powerful as photos in a box


It's just not where they belong.  Photos were meant to be seen.  They weren't ever meant to be stored--either digitally or in a box.  It's just not their purpose.  Photos are supposed to be looked at.

There's great power in photos--the ability to remember, to laugh, to enjoy, to heal, to fall in love again.

Set your photos free by putting them in digital memory books (digital scrapbooks, digital photo books).  Digital has many advantages--the ability to make multiple copies, for example. 

Find a high-quality solution that works for you!  See {several heirloom-quality options right here}, then get started!


Whatever you choose, just be sure you're not keeping something as powerful as photos in a box.  

They were never meant to go there.  Same thing with digital storage.  It's not where photos belong.  Backups are great, sure, but THE REAL THING is the one you see, the one you interact with.  

There's a very real power there.  Unleash it.

Monday, November 7, 2016

love your job


I love doing something that matters.  If fact, I NEED TO do something that matters.

I believe passionately that memory-keeping is priceless, and I feel keenly that we have ONE chance at it.  Memories fade and moments pass.  I believe passionately that we can't afford to pass up what preserving our life stories and photos gives us:
  • an increase in happiness
  • therapeutic benefits including healing from grief and loss
  • increased self-esteem (especially in children)
  • a sense of belonging and security (especially for children)
  • improved connections with others
  • stress reduction
I love sharing beautiful, meaningful, high-quality ways to preserve photos and memories and life stories that will last.  I am passionate about inspiring, educating, and helping people to not just realize but FEEL the gift that photos are.

What's your passion?  What drives you?  What's something you could do that wouldn't feel like work?

Do you know someone who is passionate about photos and memories and preserving them?  Do you know someone who is their family's historian?  Do you know someone who loves genealogy?

Our passions are ours for a reason.  What's yours?

For more information about sharing the passion of memory-keeping, explore the "make it your side gig" tab at the top of this blog, or contact me using the "contact me" tab above.  I'm a supportive and no-pressure team leader, and a memory-keeping business is a rewarding place to be.